OK, tomorrow is pancake day and here's my recipes. With having chooks running around the garden it means we have chicken sh!t everywhere! It also means we have a good supply of eggs, which in turn means we have pancakes every week, and usually more than once.
A little while ago I spent an AGE researching and trying out different recipes until I settled on this one. I prefer a 'crepe' style pancake, and I don't think there is anything better than this!
Here's how. In a bowl you want 300ml milk, 125g flour, 2 eggs, dash of sugar and a pinch of salt. You can also add some melted butter or even a little vanilla extract if you fancy. Whisk this up to make your batter. The key to making the perfect pancake is to get a good heavy bottomed frying pan on a med-low heat. Once up to temperature you put a small amount of sunflower/veg oil in the middle of the pan and use a piece of folded up kitchen paper to spread the oil around the base of the pan. You want just enough batter in the pan to cover the bottom - which depends on the pan and ladle/spoon you use. As the edges become done use a plastic spatula to tempt them away from the pan. Once this side is done it should have come away enough for you to toss, and will then only need a minute or two on the second side before being done. After the first two or three you will notice the pancakes are cooking quicker so drop the heat down a little bit to ensure consistency.
To finish lemon and sugar is fine, but bacon and maple syrup is the pancake of champions!
Showing posts with label Recipe. Show all posts
Showing posts with label Recipe. Show all posts
Monday, February 20, 2012
Wednesday, October 19, 2011
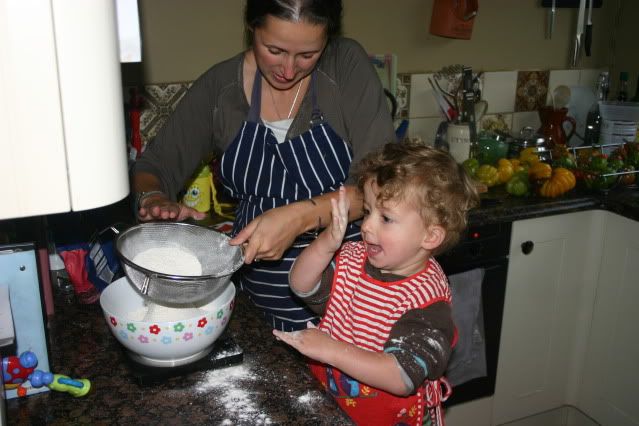
Alfies First Baking Adventure
OK, so on Monday I had a super productive day. I made the most awesome tomato, mini pumpkin and chili soup for dinner and it was all sat with fresh bread ready to eat before Tash got home ... and so I had the genius idea of prepping some ingredients to bake some cakes with Alfie.
The plan was to get everything ready so we could do it when Tash got home ... cos I was sure it was gonna take two to monitor Alfie with floury ingredients!
Everything was kept simple, ideal for a child with about a 13 second attention span - and what could be more perfect than vanilla cupcakes with a chocolate frosting/icing!!
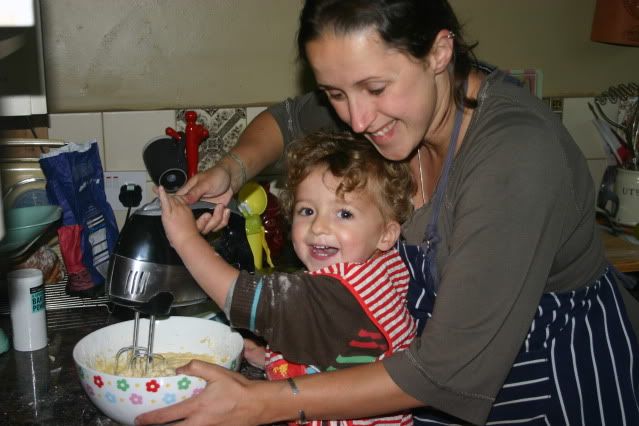
The cake recipe was 150g butter, 150g caster sugar, 100g plain flour, 1 tsp baking powder, 1 tsp vanilla extract, 3 eggs ... and Alfie was only too keen to help out with the measuring, literally diving in with two hands!

And he mastered the electric mixing quick-smart, and only tried to stick his fingers in the whisk attachments about four times! (which I considered a success!)

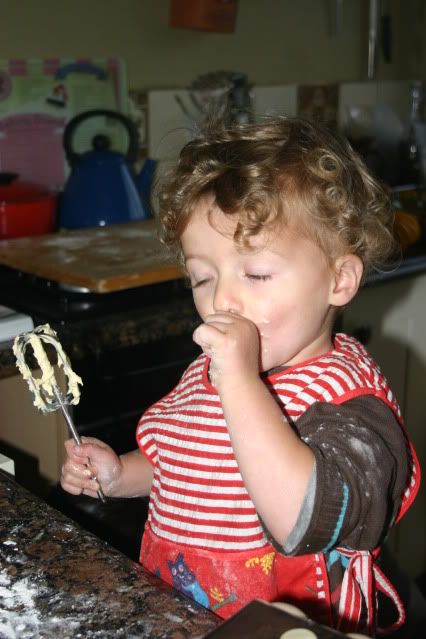
Tash measured out the batter into the cupcake cases and each one was baked at 160 for about 20 minutes. Whilst the cakes baked Alfie got on with cleaning the whisk attachments!

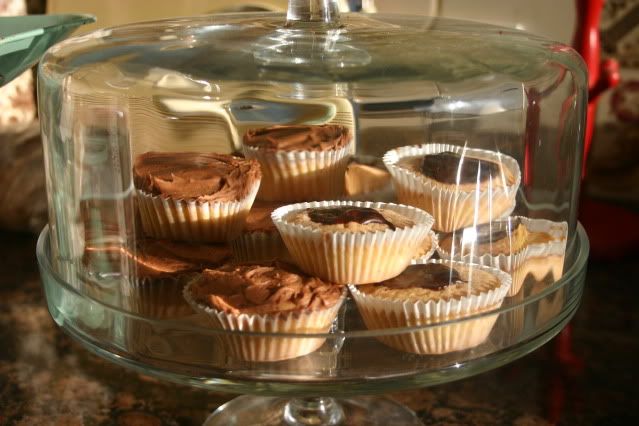
Once cooled I gave half of the cakes a chocolate frosting and half a chocolate icing (cos my awkward wife doesn't like frosting apparently). Far from baked works of art, they are however baked gems of tasty joy! Alfie confirms this with lots of pointing at the cake stand accompanied with 'mmmmmmmmm' noises.

Incidentally, if you would like to learn how to decorate cupcakes properly (not like my half arsed attempts) then you might like to know my gorgeous friend Holly Bell (who was in the final three of this year Great British Bake Off) is now running classes up in Leicestershire. She's got a real eye for this kinda thing, and I can guarantee she'll be the most welcoming host and helpful teacher. Click here to be taken to her website where you can book your place!
The plan was to get everything ready so we could do it when Tash got home ... cos I was sure it was gonna take two to monitor Alfie with floury ingredients!
Everything was kept simple, ideal for a child with about a 13 second attention span - and what could be more perfect than vanilla cupcakes with a chocolate frosting/icing!!
The cake recipe was 150g butter, 150g caster sugar, 100g plain flour, 1 tsp baking powder, 1 tsp vanilla extract, 3 eggs ... and Alfie was only too keen to help out with the measuring, literally diving in with two hands!
And he mastered the electric mixing quick-smart, and only tried to stick his fingers in the whisk attachments about four times! (which I considered a success!)
Tash measured out the batter into the cupcake cases and each one was baked at 160 for about 20 minutes. Whilst the cakes baked Alfie got on with cleaning the whisk attachments!
Incidentally, if you would like to learn how to decorate cupcakes properly (not like my half arsed attempts) then you might like to know my gorgeous friend Holly Bell (who was in the final three of this year Great British Bake Off) is now running classes up in Leicestershire. She's got a real eye for this kinda thing, and I can guarantee she'll be the most welcoming host and helpful teacher. Click here to be taken to her website where you can book your place!
Tuesday, October 18, 2011
The Tomato Harvest
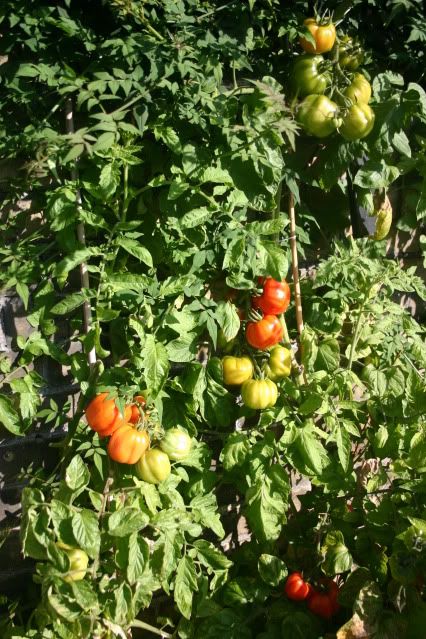
Every year I plant a large number of tomato plants, and this year I focused on some bigger varieties with the aim of a bumper crop.
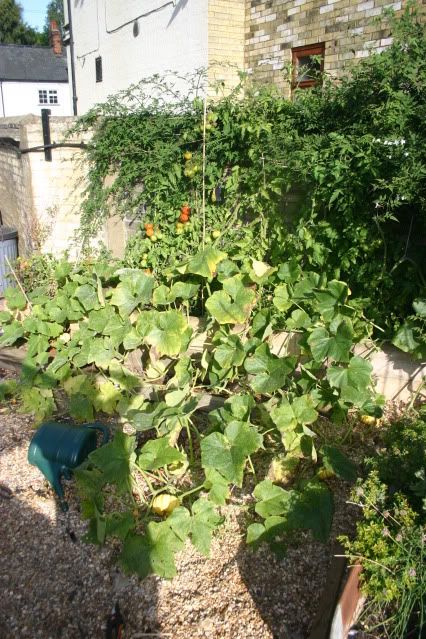
I been slow posting these pics, but you can see that by mid Sept they veg had well and truly taken over the garden! The tomatoes were growing like crazy, and some weird mini pumpkins had decided to grow all across the gravel paths!


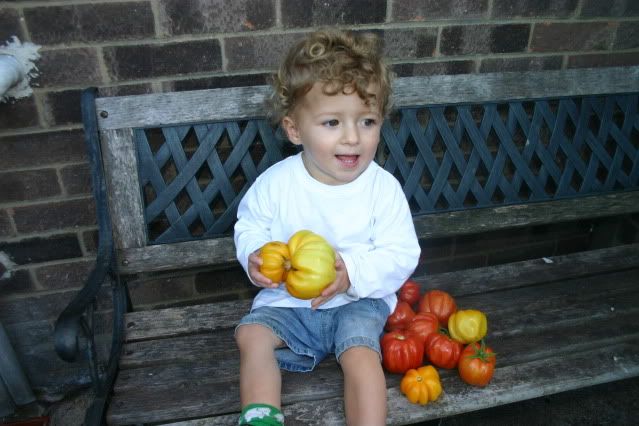
Alfie started picking a few a number of weeks back;

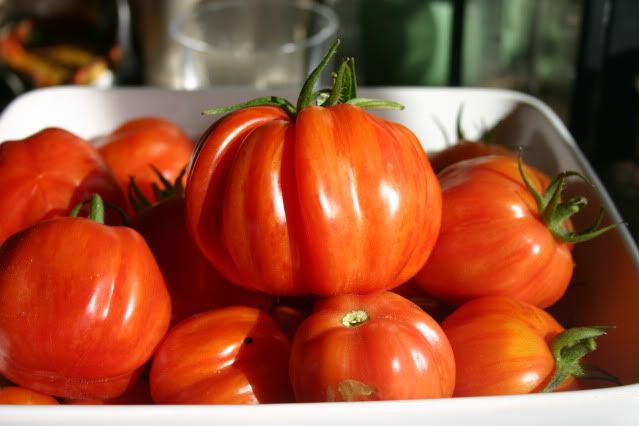
And I picked a load to ripen up whilst we were away last weekend. And yes, that one at the front is ONE tomato!

But before then I collected about 1.5kg of ripe toms and made the most awesome sauce. Its kinda the reason I grew them, I wanted a big stock of sauce ready to go for pasta and pizza bases.

So here's what you do. In a big stock pot sweat an onion in a good glug (or five) of olive oil. Add a diced apache chili. Add your 1.5kg of toms (chopped). Once they start to reduce and give out a little liquid add a tablespoon of balsamic vinegar and just under a tablespoon of caster sugar. Leave over a low heat until it has reduced to the consistency you desire.
When needed, just add a generous handful of fresh basil and it is tomato perfection!
I been slow posting these pics, but you can see that by mid Sept they veg had well and truly taken over the garden! The tomatoes were growing like crazy, and some weird mini pumpkins had decided to grow all across the gravel paths!
Alfie started picking a few a number of weeks back;
And I picked a load to ripen up whilst we were away last weekend. And yes, that one at the front is ONE tomato!

But before then I collected about 1.5kg of ripe toms and made the most awesome sauce. Its kinda the reason I grew them, I wanted a big stock of sauce ready to go for pasta and pizza bases.
So here's what you do. In a big stock pot sweat an onion in a good glug (or five) of olive oil. Add a diced apache chili. Add your 1.5kg of toms (chopped). Once they start to reduce and give out a little liquid add a tablespoon of balsamic vinegar and just under a tablespoon of caster sugar. Leave over a low heat until it has reduced to the consistency you desire.
When needed, just add a generous handful of fresh basil and it is tomato perfection!
Wednesday, September 07, 2011
Poppy Seed Roll Loaf

This one's for Urvashi!
After last weekend's joyful stollen my thoughts once again turned to a sweet loaf to enjoy on a Sunday afternoon with a cup of tea. Lacking marzipan, but with an abundance of poppy seeds I turned my focus to a rolled poppy seed loaf.
The rest of this post is going to be fast and simple and to the point - Alfie has just woken up, so I need to get up to him before he manages to further his attempts at bookcase basejumping.
Ingredients;
350g bread flour
3g salt (don't scrimp on it here Urvashi!)
25g caster sugar
10g dry yeast/20g fresh yeast
120g milk
1 egg, beaten
50g butter, melted
115g icing sugar
lemon juice
water
almonds
Warm your milk. Add the yeast. In a bowl add the flour, salt & caster sugar. Once the yeast has done its thing, add the milk, egg and butter to the bowl. Mix together, turn out onto your worksurface and knead until nice and elastic. Clean the bowl, gather your dough into a ball, and place the dough in the bowl and cover with clingfilm. Leave to double.
Whilst the dough goes about its business make the filling. Get about 120g poppy seeds and pour boiling water over them. Once cooled, strain through a fine sieve. Melt about 50g butter in a pan, add the poppy seeds and cook for a minute or two. Remove from the heat and add 75g caster sugar, 50g ground almonds, 50g candied peel, 75g raisins and 1/2 tsp of cinnamon. Leave to cool.
Once the dough had doubled in bulk turn it out onto your worksurface, knock back and spread out into a shape roughly the size of a magazine page. Spread the filling over the dough, leaving a little gap around the edge, and then roll up from one of the long edges. Place on a lightly floured baking sheet and cover with lightly oiled clingfilm. Leave to double.
Get your oven warmed to 190 degrees and once the dough is ready bake for 30 minutes. Cool on a wire rack.
To finish mix the icing sugar with about a tablespoon of the lemon juice and add whatever water might be required to give a nice glaze that just runs off the back of a spoon. Drizzle said glaze over the loaf and add a few almonds to make it all look pretty.
This recipe is winner. Alfie says so. He even prefers it to pecan pie! Speaking of the 'child of max doom', I'd better go get him up now ...
Wednesday, August 31, 2011
A Taste Of Winter In Summer

After making the cake for Lyds birthday I was left with a remainder of marzipan kicking about that I wanted to do something with. I really had no ideas; I'm not the biggest cake baker and nor am I the biggest marzipan fan.
So I asked my friends on Facebook what I should do with 200g of marzipan and Ben Frazer (who was also in the Bake Off this year) came up with the genius suggestion of stollen. Not only is it something I had never tried (which therefore appealed) but its also a firm favourite of Tasha's!
After some searching of the Internet (and also of my cupboard) this was the recipe I stuck together. Its strongly based on something by Delia, but tweaked based upon others I read and what ingredients were available to me.
350g bread flour
150g milk
50g caster sugar
10g dried yeast
2g salt
110g butter
1 egg
90g raisins (you could split this with sultanas or currants)
40g chopped dried apricots
25g glace cherries (quartered)
25g mixed candied peel
25g ground almonds
25g whole almonds
200g marzipan
a good glug of Sailor Jerry
Here's what ya do....
1) get your raisins and apricots in a bowl and give them a good glug of rum to soak in. Let them soak for as long as you can. I've since found a jar marked "boozy fruits '08 which I'll be using next time!
2) warm the milk, add a little of the caster sugar and the yeast. Set aside and watch it form a foamy head
3) in a mixing bowl add 325g of the flour (notice that is not all of it), the milk from step 2, butter, remaining sugar, salt and egg (beaten).
4) mix it all together and then add the fruits and nuts. (don't add the surplus Sailor Jerry, this dough is wet enough as it is!)
5) knead it on your worktop for 5 mins, clean the mixing bowl, get the dough back in the bowl and cover with clingfilm. Set it aside to double. Don't rush these things, mine sat for 2 hours.
6) turn the dough back out onto your worktop and add the remaining 25g of flour. Knock it back and give it a good knead for a few minutes.
7) push the dough out till its roughly the size of a magazine. Roll out the marzipan until its roughly the width of your dough. Place the marzipan at the top of your dough and roll up the dough, tightly wrapping your marzipan within your doughy goodness.
8) set the oven to 190 degrees, dust your baking tray and place your unbaked stollen into the middle. Lightly oil some clingfilm (this stops it sticking to the dough) and cover the dough once more to double in size.
9) once doubled bake for 35 minutes.
This will give you a great stollen, equally perfect for breakfast or afternoon tea. As you can see I went with more of an afternoon tea focus with mine and mixed 110g icing sugar with a tablespoon (plus a squeeze) of lemon juice to make a sweet glaze.
Save this recipe, you'll want it when December arrives I promise you!
Monday, July 04, 2011
Sour Cherry Meringue Pie
I love it when June comes around, it means it will only be a matter of days until I can collect cherries and that means Sour Cherry Pie! Best of all it means I get to climb trees!
However this years sour cherry pie was going to be different! Tash came up with the idea when we were putting together Bake Off recipes, and although there was zero chance I would ever have actually made this (due to the fact it would have been 6-8 weeks too early) I thought it was such an awesome idea we had to give it a go this year once this years cherries filled the trees. The plan was to take my traditional cherry pie to the next level with a 'meringue twist' - my first ever meringue pie.
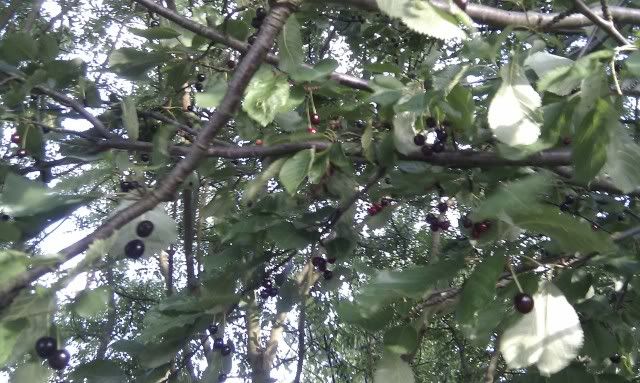
So click back a couple of weeks and I'd just got back from the fishing trip. I took the dogs out for a walk, and took a route that takes me over the railway line to check out the cherries. As I approached the row of trees I could see an endless collection of cherry stones on the floor - the birds had beaten me to it!
As I walked on feeling pretty annoyed I happened to look up, and was greeted with a sight of unrivaled beauty! (?) I didn't even know that tree was there!

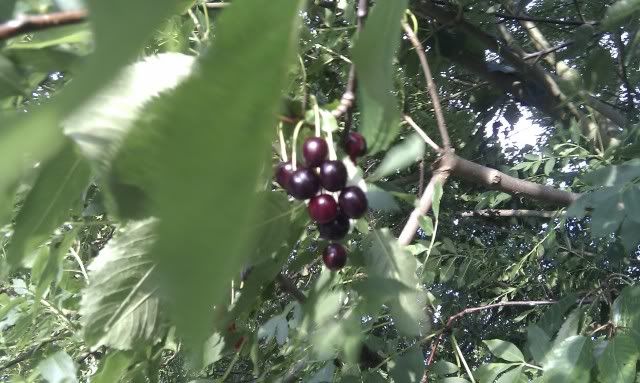
And so that evening I wandered back over to the tree, and armed with a Waitrose plastic bag I set about collecting as many of the little bubbles of cherry filled joy as I could gather!

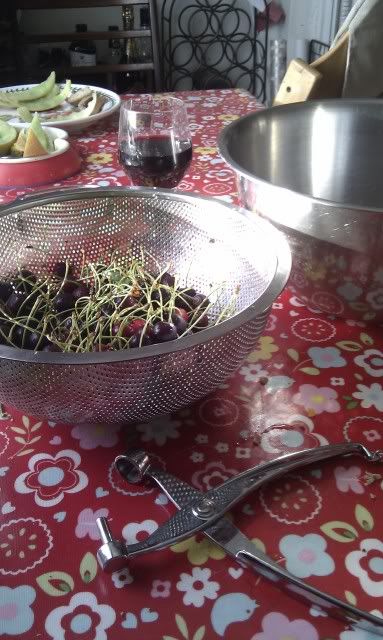
The next few evenings saw me revisit the tree and in totally I took over 2.5kg of cherries AFTER they were stoned. Ah yes, the stoning. Much time was spent amidst the following layout. Cherries, stoner, bowl for stoned cherries. Every evening I ended up with backache and stained fingers, but no pain no gain, right? Thankfully the accompanying glass of Rioja helped ease the pain and monotony of stoning 4275 cherries (well it seemed that many to me anyway!)

Knowing I was going to make a meringue I decided to give my baking a kick up the backside and bring it into the 21st century - I bought an electric handmixer! These kinda gizmos go totally against my way of baking, but I knew the meringue was gonna be hard work without one, plus there was a certain something that sold it to me!

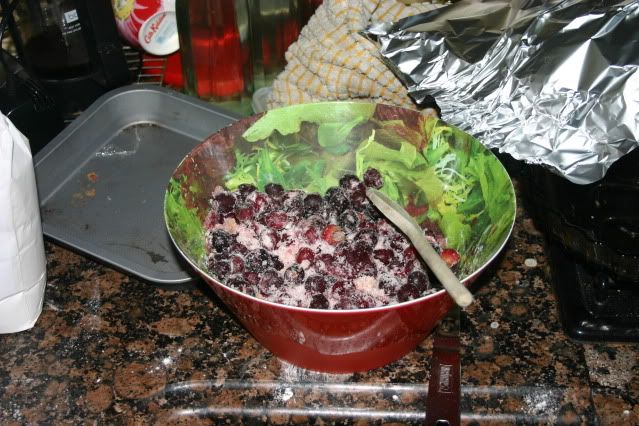
A rough recipe was drawn up, pastry was made, a boat load of sugar was added to the cherries and I set about making the meringue pie. Putting my 'turbo' button to good use I made the meringue, and got the pie swiftly in the oven.

A quick peek in the oven confirmed one of my worries - there was way too much juice from the cherries! Still, that's easily amended for next time and overall I was pretty pleased with the way it came out.

I'd probably go for a touch more meringue next time, but it tasted bloody amazing - quite possibly nicer than
my sour cherry pie! Alfie certainly seemed to think so!

However this years sour cherry pie was going to be different! Tash came up with the idea when we were putting together Bake Off recipes, and although there was zero chance I would ever have actually made this (due to the fact it would have been 6-8 weeks too early) I thought it was such an awesome idea we had to give it a go this year once this years cherries filled the trees. The plan was to take my traditional cherry pie to the next level with a 'meringue twist' - my first ever meringue pie.
So click back a couple of weeks and I'd just got back from the fishing trip. I took the dogs out for a walk, and took a route that takes me over the railway line to check out the cherries. As I approached the row of trees I could see an endless collection of cherry stones on the floor - the birds had beaten me to it!
As I walked on feeling pretty annoyed I happened to look up, and was greeted with a sight of unrivaled beauty! (?) I didn't even know that tree was there!
And so that evening I wandered back over to the tree, and armed with a Waitrose plastic bag I set about collecting as many of the little bubbles of cherry filled joy as I could gather!
The next few evenings saw me revisit the tree and in totally I took over 2.5kg of cherries AFTER they were stoned. Ah yes, the stoning. Much time was spent amidst the following layout. Cherries, stoner, bowl for stoned cherries. Every evening I ended up with backache and stained fingers, but no pain no gain, right? Thankfully the accompanying glass of Rioja helped ease the pain and monotony of stoning 4275 cherries (well it seemed that many to me anyway!)
Knowing I was going to make a meringue I decided to give my baking a kick up the backside and bring it into the 21st century - I bought an electric handmixer! These kinda gizmos go totally against my way of baking, but I knew the meringue was gonna be hard work without one, plus there was a certain something that sold it to me!


I'd probably go for a touch more meringue next time, but it tasted bloody amazing - quite possibly nicer than
my sour cherry pie! Alfie certainly seemed to think so!

Wednesday, October 21, 2009
What is the opposite of a Green Tomato?
One of the unintended consequences of being off work at the moment is that I am spending rather a lot of time in the kitchen. After the Flapjacks of Redemption, today was the turn of Opposite Tomato Sauce, which I write about because I'm sure it will help a few of you out and frankly, is just tear jerkingly delicious.
Like a lot of folk, we have had issues with our tomatoes ripening this year. We had plenty of plants, all with plenty of tomatoes, but the stubborn little suckers seemed determined to stay green. Rather than waste them, we picked them and today I had the opportunity to put them to good use.
On Monday, Mum brought a chicken with her to make a batch of chicken soup. Not only did it make an eight person vat of soup, it then went into the oven to be roasted and fed the four of us, with enough left on there to feed another four people in style – never let it be said us Llanitos can't make the most of a tasty bird!!
This is also where the green tomatoes come in because part of the Garcia Mercy Mission meant we had a small tub of sun dried tomatoes in the fridge. Not to be outdone in the thrift department, I decided to do a chicken pasta dish using up the available tomatoey treats – a kind of opposite tomato sauce.
The recipe, in true Llanito fashion is somewhat open to interpretation but I would really suggest you try it because the result is the most incredible sweet and sour tomato sauce with just the merest hint of ooh la la!!
Opposite Tomato Sauce
1 red chilli3 cloves of garlic
1 onion
10 green tomatoes
1 Small tub of sun dried tomatoes
1 Stock Cube
Sugar (to taste)
Sherry (large glug)
Water
Roughly chop all of the ingredients and stick them in a pan with a good slug of sherry and enough water to just cover everything.
Clamp on a lid and set on a really slow bubble for as long as you can stand to wait
Blitz the sauce until smooth and adjust the sugar and seasoning.
Mix with the pasta of your choice, either with left over meat or just as it is.
You can thank me later.
Wednesday, September 16, 2009
Breathe In
Why is it I'm always tempted to assume a northern accent and say "Day x at the Big Brother House" when I make these updates? I hate Big Brother, I never watch it, and yet after 10 years, it has somehow invaded my consciousness.
 Right, bathroom progress. As you can see there has been rapid progress, with the pipes being boxed in and the major appliances offered up to their final resting places. I am still in shock that it all physically fits although the toilet does now pose an interesting conundrum.
Say for instance, you are alone in the house and are taken by a call of nature and decide not to bother closing the door. While you're busy catching up on the latest edition of Classic Bike magazine (or a publication of your choice) you are surprised by your other half arriving back home. What do you do? Close the door perhaps?
Error!
It turns out that in my scramble to save space in the width department I have slightly overlooked the depth aspect of the dimensional dance.
If you are sitting on the toilet with the door open, there is no earthly way that you can later close the door, not unless you are one of those Chinese acrobats who can fold themselves into an origami crane while still smiling broadly.
Something to consider in the event you're at ours answering a call of nature.
 And in other news, here is the first of the Autumn Cakes for the year:
It is an old recipe scanned and mailed over by my mum some time ago, and since I can't find a similar recipe online, I feel it is my duty to share it with you so you too can chomp down on a slice of moist, apply, cinnamony heaven.
And I ought to say thank you to Mrs R Pugh of Monkhampton, Shropshire who originally submitted this recipe to a publication lost long ago in the mists of time.
Autumn Apple Cake
2-3 Cooking Apples
150g/5oz margarine
150g/5oz brown sugar
2 eggs
1 tsp ground cinnamon
225g/8oz self raising flour
100g/4oz chopped nuts of whatever kind you especially like. Pumpkin seeds work very well, as do walnuts.
Grated lemon rind
Prepare and cook the apples with a little water and mash or sieve. You should end up with 100-175g/ 4-6oz pulp (dontcha love the waftiness of the measurements, this is my kinda baking!!).
Allow to cool
Cream margarine and sugar, add eggs. Add the cinnamon and four. Add nuts and lastly stir in the pulped apples and grated lemon rind to taste.
Put into a greased cake tin and sprinkle with castor sugar (if you like that sort of thing, personally I think it is the devil's own work).
Cook in a moderate over (180oc) for 45-55 minutes.
The final note from Mrs Pugh is that this cake keeps very moist and she wasn't kidding!! If you make one of these you can tuck into chunks of fruity mellow cakiness for days afterwards that give you a bonus burst of mellow apple every now and then.
Heaven.
Tuesday, June 02, 2009
Baby Steps
 As promised, I made a start on the areas of the nursery wall that required least talent, blocking the colour for the riverbank and the letters and painting in a few of the less demanding outlines.
I fully recognise I am never going to be lauded as the new Da Vinci, so despite desperately wanting to get on and finish the whole wall, I am imposing a ban on myself even looking at the wall until Matt comes up to rescue the situation.
Hopefully his diary will allow for a visit before my resolve breaks.

There was another small step towards household nirvana this weekend, which was a nice antidote to the otherwise terminal decline of the kitchen. Keith finally got the kitchen larder to open all the way out.
His method: he pulled on it, hard. God bless brute force and ignorance, although it does make the fact that we’ve been living with a half opening larder for nearly 3 years a bit of a joke.
And in other exciting news: as I sit here and type, the tiler is in the lounge priming the floor ready for our new tiles. And I have to admit, I’m a little bit excited…. And now also needing to vacate the house to avoid noxious fumes.
Before I go though, I was sent a recipe for the most dangerous chocolate cake in the world yesterday (thanks Polly!!) and of course Keith gamboled into the kitchen to make one as soon as he saw the words "ready","five" and "minutes". I wouldn't say it was the greatest triumph of the modern culinary age - potentially due to the fact that a slightly too long cooking time had resulted in a cake with the ability to suck the moisture from every last crevice of your body. It was a laugh though, and for those of you in need, I include the recipe below:
5 MINUTE CHOCOLATE MUG CAKE!!
4 tablespoons flour
4 tablespoons sugar
2 tablespoons cocoa
1 egg
3 tablespoons milk
3 tablespoons oil
3 tablespoons chocolate chips or (optional)
A small splash of vanilla extract and your favourite tipple
1 large coffee mug (NB It needs to be VERY large, as we found out!!!)
Add dry ingredients to your largest mug and mix well.
Add the egg and mix thoroughly.
Pour in the milk and oil and mix well
Add the chocolate chips (if using), vanilla extract and a drop or two of your favourite tipple, then mix again.
Put your mug in the microwave and cook for 3 minutes at 1000 watts (high).
The cake will rise over the top of the mug, but don't be alarmed!
Allow to cool a little, and tip out onto a plate if desired.
EAT!
Subscribe to:
Comments (Atom)